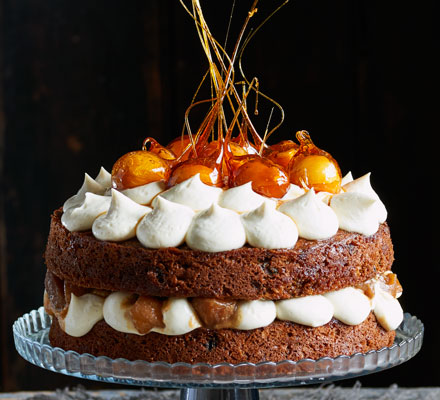

Toffee apple cake
By Miriam Nice
This showstopping bake is a celebration of classic apple desserts with spiced sponge, vanilla icing and a sticky caramel apple filling
-
Prep:1 hrs
Cook:35 mins
plus cooling - Serves 16
- A challenge
Nutrition per serving
-
kcal 465
-
fat 27g
-
saturates 11g
-
carbs 48g
-
sugars 38g
-
fibre 2g
-
protein 5g
-
salt 0.6g
Ingredients
- 150ml vegetable oil, plus extra for greasing
- 175g dark brown soft sugar
- 2 large eggs
- 250g eating apples (prepared weight – about 3 apples), peeled, cored and coarsely grated
- 200g self-raising flour
- 2 tsp ground cinnamon
- 1 tsp ground ginger
- 1 tsp bicarbonate of soda
- 25g rolled oats
- 50g ground almonds
- 100g sultanas
- zest 1 lemon
- juice 1 lemon
- 4 eating apples (I used Pink Lady)
- 25g butter
- 50g dark brown soft sugar
- 1 tbsp golden syrup
- ¼ tsp cinnamon
- 100g white caster sugar (optional, for the tiny toffee apples)
- 75g dark brown soft sugar
- juice 1 lemon
- 1 tbsp brandy, or water
- 50g butter
- 100g white chocolate
- 280g tub cream cheese
- 1 vanilla pod, seeds only
- 170g pot Greek yogurt
- 8 long wooden skewers (optional, for the tiny toffee apples)
Tip
Top tipThis cake will still taste fabulous without the tiny toffee apple decoration, so if you're pushed for time, simply peel and chop the apples into chunks with a knife instead of a melon baller when you make the filling. You could also decorate the cake with sprigs of fresh bay leaves or rosemary poked into the top at regular intervals - they'll smell nice and give a dramatic, rustic effect. If you're celebrating a birthday, all you need are candles.
Method
Start by making the cakes. Heat oven to 180C/160C fan/gas 4. Line 2 x 18cm springform cake tins with baking parchment and brush with a little oil. Put the sugar and eggs in a large mixing bowl and whisk with electric beaters until glossy and pale. Keep the beaters running as you pour in the oil.
Stir in the grated apple, then fold in all the other cake ingredients. Divide the mixture between the tins and bake for 30 mins or until a skewer inserted into the middle comes out clean.
While the cakes cook, prepare the apple filling. Tip the lemon juice into a large bowl and fill halfway with cold water. Peel the apples, then cut into spheres using a melon baller – pop them in the bowl of lemon water as you go to stop them discolouring. In a medium saucepan, combine the butter, dark brown sugar, golden syrup, cinnamon and 200ml water, and heat until boiling. Take the apple balls out of the water and put them in the pan –if you want to make the tiny toffee apples for the top, keep 8 apple balls in the water until needed. Bring the mixture in the pan back to the boil for 8 - 10 mins or until the apples are soft but not losing their shape, and a thick syrup starts to form. Remove from the heat and allow to cool completely, then chill until needed.
Stir all the syrup ingredients together in a bowl. When the cakes are cooked, keep them in the tin but prick holes all over the surface with a skewer and drizzle the syrup over. Leave the cakes to cool completely in the tin.
While the cakes cool, make the icing. In a small heatproof bowl set over a pan of simmering water, melt the butter and white chocolate together. Once melted and glossy, pour into a large bowl. Add the cream cheese, whisk until smooth, then add the vanilla. Finally, fold in the yogurt. When the mixture is cool, chill until needed.
To assemble the cake, take the cooled sponges out of their tins and put one of them on a cake stand. Top with half the white chocolate icing – use a spoon or pipe it using a very large round nozzle. Scatter the cooked apple pieces, along with a drizzle of the syrup, over the icing, then place in the fridge to firm up for 15 mins. Add the top layer of the cake, then decorate with the rest of the icing by piping it in lots of regular little mounds all over the top using a large round nozzle. Put the whole cake in the fridge until ready to serve. Will keep for 2 days in the fridge.
For a showstopping, but optional, finish, make some beautiful miniature toffee apples. Their effect is stunning but fleeting, so make them just before serving your cake, as the caramel will dissolve quickly due to the moisture in the air. Brush a baking tray with a little vegetable oil and set aside. Very thoroughly dry the reserved apple balls from step 3 of the cake with kitchen paper or a clean tea towel and insert a long wooden skewer into each one.
Put the caster sugar in a small saucepan over a medium heat, stirring often, until the sugar melts. Keep cooking until the sugar has become a liquid golden caramel, then remove from the heat. If it looks like it’s getting too hot, sit the base of the pan in a heatproof dish of cold water.
Tilt the pan and, working quickly (as the sugar will continue to cook), hold the apple balls by the skewer and dip each one in turn into the caramel and twist it around to coat it. It’s really important that the apple balls are well dried and that you don’t turn them in the hot caramel more than twice, otherwise the apple will cook and release liquid, which will stop the caramel from sticking. As soon as they are coated, slowly lift them out vertically. Hold the apple up out of the pan and pause before transferring it to the oiled tray on its side. Holding it up like this will allow a long drip of caramel to set hard and create a beautiful long spike. Repeat the process with the rest of the apples, working quickly so that the caramel doesn’t harden completely before all the apples have been coated. However, don’t worry too much as you can always gently reheat it over a low heat before continuing – just be careful not to burn it, otherwise it will taste bitter.
After a couple of minutes, the apples should have set. When they are cool enough to handle, pull out the skewers. Place the apples on top of the cake so that the spike is pointing upwards and the base of the apple (where the skewer was) is pressed into the icing. Serve immediately.