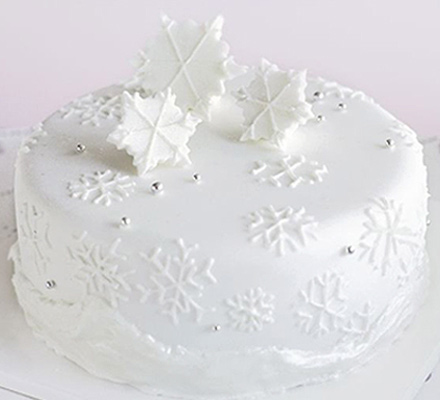

Sparkling snowflake cake
By Jane Hornby
This stylish, shimmering cake is ideal if you’ve had some practice at cake decorating before
- Takes 1½ hours, plus overnight drying
- Serves 12
- Easy
Nutrition per serving
-
kcal 0
-
fat 0g
-
saturates 0g
-
carbs 0g
-
sugars 0g
-
fibre 0g
-
protein 0g
-
salt 0g
Ingredients
- 18-23cm fruit cake (see link below) covered with marzipan and ready-to-roll white icing
- 250g white ready-to-roll icing
- 1 quantity soft royal icing
- edible silver lustre, edible silver balls and edible sparkles, fine writing tube and small piping bag
Method
Knead the ready-to-roll icing until smooth, then roll out to approx 1cm thickness. Using snowflake cutters of various sizes, stamp out 3 snowflake shapes. Lay the snowflakes on baking parchment on a flat surface and leave overnight to harden. Keep any trimmings and wrap up in cling film.
Next day, make the royal icing. Drop a writing tube into a piping bag and spoon in a third of the icing. Spread the rest around the base of the cake to create a snowdrift effect. Pipe snowflake outlines over the cut-out snowflake shapes and pipe snowflakes all over the surface of the cake in different sizes and designs. Leave for 1 hr until the icing has hardened slightly, then sprinkle silver lustre over the cake, snowdrift and snowflakes.
Using the leftover ready-to-roll white icing, mould thimble-sized supports for your snowflakes to lean against. Position the snowflakes on the top of the cake. Finally, fix the silver balls to the icing with a little more of the royal icing. Finish by scattering sparkles over.