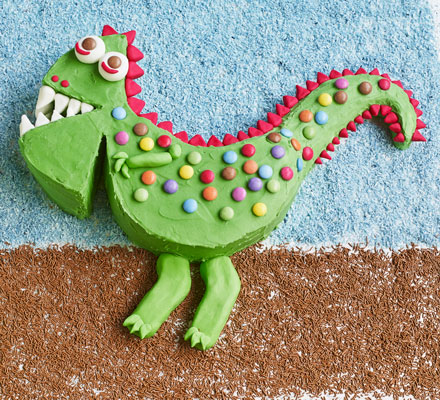

Dinosaur cake
By Jane Hornby
This show-stopping party cake is deceptively easy to make and looks really professional. Ideal for kid's birthdays, try this colourful decorated vanilla sponge with bite
-
Prep:20 mins
Cook:25 mins
plus cooling and decorating - Serves 20
- Easy
Nutrition per serving
-
kcal 471
-
fat 24g
-
saturates 15g
-
carbs 59g
-
sugars 48g
-
fibre 1g
-
protein 4g
-
salt 0.39g
Ingredients
- 250g pack unsalted butter
- 50ml whole milk
- 150g whole natural yogurt
- ½ tsp vanilla paste or extract
- 3 large eggs
- 250g white caster sugar
- 300g self-raising flour
- 2 tsp baking powder
- 300g unsalted butter, very well softened
- 450g icing sugar
- 1 tsp vanilla paste or extract
- 2 tsp whole milk
- 2 heaped tbsp raspberry jam ( or lemon curd)
- 1kg white sugarpaste
- green and pink food colouring paste (we used Sugarflair Spring Green and Fuchsia)
- a little icing sugar, sifted, for rolling out
- 38g tube Smarties
- 22inch/55cm square cake board
- 100g royal icing sugar
- 100g desiccated coconut
- blue food colouring paste
- 100g chocolate sprinkles
Tip
Smoothing icingA few bits that won’t smooth properly? Dip the palette knife in to a jug of very hot water, dry it, then smooth the icing.
Method
Heat the oven to 180C/fan 160C/gas 4. Use a little of the butter to grease the sides and bases of two 20cm sandwich tins. Melt the rest of the butter in a small saucepan. Off the heat, add the milk, yogurt and vanilla, followed by the eggs. Beat well with a fork.
Put the dry ingredients plus ¼ tsp salt into a large bowl. Whisk to combine – this aerates and saves sifting. Tip in the wet ingredients and whisk to a smooth, silky batter.
Don’t hang around at this point. Pour the batter evenly into the prepared tins and put onto the middle shelf in the oven. Bake for 25 mins or until risen and a skewer inserted into the middle of the cakes comes out clean. Cool for 10 mins in the tins, then carefully invert the cakes and leave to cool upside down on a cooling rack.
Make the buttercream. Put the butter into a large bowl and sift the icing sugar on top. Add the vanilla and milk and a pinch of salt then beat for a few mins with electric beaters until creamy, pale and spreadable.
Sandwich the cakes with just under ¼ of the buttercream and then all of the jam, if using. Mark the cake into six then cut out two of the wedges. Chill all of the cake in the fridge for 30 mins to firm up the crumbs, which will make icing easier.
While you wait, colour the remaining buttercream with a little green food colouring gel.
Split the sugarpaste into four pieces, one 500g, one 250g, one 150g and one 100g. Colour 250g green to make the legs and arms. Colour 150g pink, to make the spines.
Position the cakes on the board and, once you’re happy, use a little buttercream to anchor them. The main part of the cake will make the body of the dinosaur and the root of its tail, and the two cutout wedges will make the face.
Shape the 500g piece of sugarpaste to make a tail, tapering at the end. Flatten the other end out (the piece will look a bit like a witch’s hat at this point) and mould it over the tail part of the cake.
Using a palette knife, spread the coloured buttercream over each piece of cake and the tail.
Shape 100g white icing into eyes and teeth and poke them into the buttercream.
Shape two small sausages to make an arm, with two claws, and position on the cake. Shape the rest of the green sugarpaste into two legs, adding claws if you like. Press them into the buttercream on the dinosaur’s belly.
Shape the pink icing into spikes and position them along the spine and under the tail. Use two small sausages of pink icing for the eyelids if you like. Finally press the Smarties all over the dinosaur, saving two for the eyes. Leave to set.
If you want to cover the board, rub a few drops of blue colouring into the coconut until even. Mix the royal icing sugar with 2 tbsp water, then brush this all over the board and around the dinosaur. Sprinkle with the coconut and the chocolate sprinkles and leave to set. If the sponges are used fresh or within a day of baking (wrap well once cooled), the finished cake will keep in a cool place (not the fridge) for 3 days.