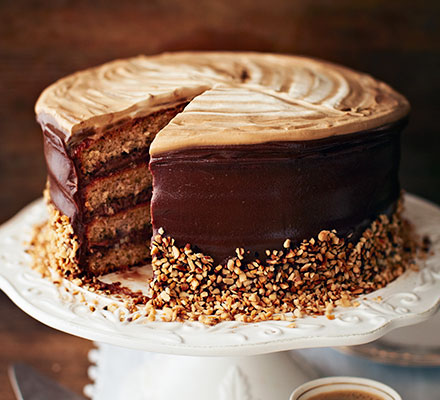

Hazelnut latte cake
By Jane Hornby
Give coffee cake the ultimate upgrade – layer with chocolate hazelnut frosting, add a creamy topping and sprinkle with crushed nuts
-
Prep:1 hrs 30 mins
Cook:25 mins
plus cooling and chilling - Serves 16
- A challenge
Nutrition per serving
-
kcal 544
-
fat 36g
-
saturates 18g
-
carbs 45g
-
sugars 33g
-
fibre 2g
-
protein 8g
-
salt 0.3g
Ingredients
- 100g unsalted butter, plus extra for greasing
- 100g bag chopped toasted hazelnuts
- 300g light brown soft sugar
- 6 tbsp semi-skimmed milk
- 1 tsp fine instant coffee powder (see tip)
- 6 large eggs, at room temperature
- 2 tbsp cornflour
- 175g plain flour
- 50g light brown soft sugar
- 1 tsp fine instant coffee powder
- 1 tbsp Frangelico (hazelnut) liqueur, or use Kahlua or Tia Maria
- 400g mascarpone
- 300g hazelnut chocolate spread (Nutella has the best texture for this)
- 1 tbsp fine instant coffee powder
- 50g chopped toasted hazelnuts
- 150ml pot double cream
- 4 tsp icing sugar
- 3 tbsp semi-skimmed milk
- 1 tbsp fine instant coffee powder, dissolved in 1 tsp boiling water
Tip
Why use instant coffee?Coffee purists may balk at using instant, but it’s the best way to get a very concentrated flavour into your cake.
Method
Heat the oven to 180C/160C fan/gas 4. Generously butter two 20cm sandwich tins (ideally about 4.5cm deep or deeper) and line the bases with baking parchment. Put the hazelnuts into a food processor with 2 tbsp of the sugar, then pulse until finely chopped. Don’t expect them to go as fine as ground almonds and avoid over-processing, as this can make the nuts greasy.
Put the butter, milk and coffee powder into a small pan and heat gently until the butter has melted. Set aside.
Now start the sponge. Crack the eggs into the bowl of a tabletop mixer, add the rest of the sugar and beat for 5-10 mins (or beat with an electric hand mixer in a large deep bowl for 15-20 mins) or until thick and billowy, and the mixture leaves a trail that holds for a couple of seconds. It is really important that the mixture has thickened, almost doubling in size, in order to achieve a light sponge.
Mix the cornflour, plain flour and 1/2 tsp salt, and sift onto the whisked mixture. Using a large metal spoon, fold in very carefully. Sprinkle in the ground nuts, then fold these in too. Pour the warm milk mix around the edge of the bowl, and fold this in. Don’t rush the folding, and continue with a light lifting and cutting motion until ribbons of liquid stop appearing. Divide the batter between the tins, then bake for 25 mins until risen to the middle and a burnished gold.
Loosen the sides of the cakes with a palette knife, then cool in the tins on a rack for 20 mins (the cakes will level off, and possibly go a bit wrinkly, but that’s normal). Carefully remove from the tins and cool, paper-side down.
Make the syrup and the frosting while you wait. Put the sugar and 4 tbsp water into a small pan. Bring to the boil and leave for 1 min then take off the heat. Stir in the coffee and alcohol. Beat the mascarpone, hazelnut chocolate spread and coffee together with a wooden spoon, until silky and even.
To assemble, cut the cold cakes horizontally across the middle, using a long serrated knife. With a pastry brush, dampen the cut surfaces all over with the syrup. Use it all. Put one cake layer onto a plate or stand, cut-side up. Spoon on 3 generous dollops of the frosting, then spread to the edges with a palette knife. The frosting should be about 5mm deep. Repeat with the next two layers. When you come to the final layer, place it cut-side down, so that the top of the cake is smooth. Paddle the rest of the frosting over the top and sides of the cake. The layer on the top can be thin. Clean the knife then use it to press a neat ring of nuts into the frosting on the side of the cake. Brush any excess away.
For the topping, put 3 tbsp of the cream, 1 tsp icing sugar and 1 tbsp milk into a small bowl. Put the rest of the cream, milk and sugar, plus most of the dissolved coffee into a larger bowl. Whip the white cream, then the coffee cream, until they look like soft cappuccino froth, thick but still able to flow from a spoon. Pour most of the coffee cream onto the cake and push it out to cover the top. Whisk a little more coffee into what is left, so that it turns a few shades darker.
To decorate with a characteristic latte ‘tree’ shape, load a pointy teaspoon with a little of the white cream. Start at the base of the tree, just right of the centre of the cake. Push the spoon into the coffee cream and let the white cream flow slowly. As it flows, drag the spoon then pull it gently away, to make a leaf-like shape. Repeat with more white cream on the left to make another leaf, then repeat 3-4 times, working up the cake top graduating from large to small leaves. Use the same technique to sweep a couple of arc shapes around the edge of the pattern.
Use the dark cream to add detail to each leaf – you can paint this on with the tip of a teaspoon or a clean cocktail stick. Use a cocktail stick to drag the points of each leaf up and outwards. Draw a line down from the top of the ‘tree’ to the bottom to finish. The cake will keep for up to 2 days. Loosely cover any cut edges but avoid covering the cake directly as you could damage the decoration. Serve from the fridge or at cool room temperature.