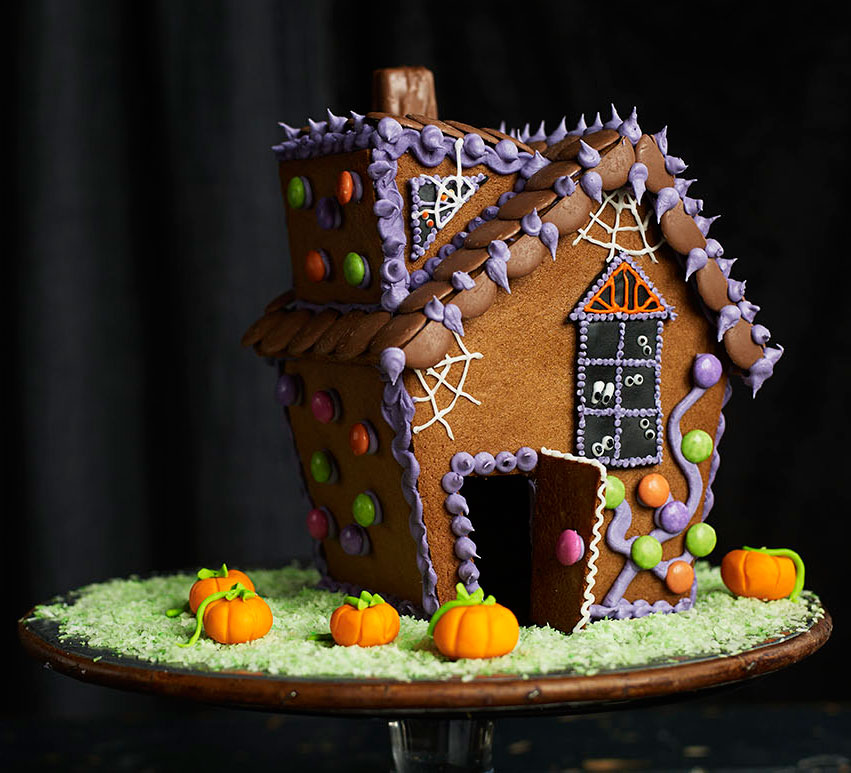

Gingerbread haunted house
By Jane Hornby
Try your hand at this Halloween themed gingerbread house – don’t worry about home-made wonkiness, it all adds to the creepy effect
-
Prep:1 hrs 30 mins
Cook:40 mins
plus overnight drying - A challenge
Nutrition per serving
-
kcal 0
-
fat 0g
-
saturates 0g
-
carbs 0g
-
sugars 0g
-
fibre 0g
-
protein 0g
-
salt 0g
Ingredients
- 175g unsalted butter
- 300g dark brown soft sugar
- 175g golden syrup
- 1 large egg, beaten
- 500g flour, plus extra for rolling
- 1 tsp bicarbonate of soda
- 1 heaped tbsp ground ginger
- 1 tbsp ground cinnamon
- ½ tsp salt
- 500g icing sugar, plus extra for rolling out
- 2 large egg whites
- purple or grey food colouring paste
- 50g desiccated coconut
- green food colouring paste
- 5 x 100g multipack of coloured fondant icing, including black, red, yellow and green
- 2 tubes Smarties
- 2 large bags chocolate buttons
- 1 Mars Bar for the chimney
- disposable piping bags
- a cake board or large flat plate about 12 inches across
- cocktail stick
Method
First make the dough. Put the butter, sugar and syrup into a large saucepan and melt gently together. Cool for 5 mins then beat in the egg. Mix the flour, bicarbonate of soda, spices and salt, then sift into the pan. Stir to make an even and shiny dough. Spread two sheets of clingfilm on the work top, tip half the dough onto each, then wrap and cool. Once cold, chill in the fridge for a few hours or overnight.
Cut the template (available to download in tips, below left) from sheets of paper, following the pattern here. Line 2 large baking sheets with parchment. Lightly flour the work surface and dough, then roll one block of dough to just thicker than a £1 coin. Place the gable end template on top, then cut around with a sharp knife. Cut away the front door from one piece. Carefully lift the walls to a lined sheet, leaving some room for spreading, then bake for 12 mins, until risen and dark golden. When the biscuits are just out of the oven, carefully trim the dough back to its original size if needed, using the templates as a guide (an adult should do this). Cool, then transfer to a rack to cool completely. Keep in an airtight tin until you are ready to build. Repeat with the rest of the dough and trimmings, baking the door and other smaller pieces for 10 mins only, until you have cut out and baked the entire house. Cut small shapes from the leftovers, to give away at the door.
Make the icing for the ‘glue’ and decoration. Beat the egg whites and icing sugar together in a large bowl, to make a smooth thick icing. Set aside a couple of tablespoons of white icing for later. Cover well so that it doesn’t dry out. Colour the rest purple, or grey, or whatever horror-house colour you like. Spoon it into a disposable piping bag and snip a few millimetres from the end. Practice piping; the line should be about 5mm across.
Stick the back of the house to the board first. Make sure that the smooth side of the biscuit is facing you, or the wall will be the wrong way around. Pipe a generous line of the purple icing along the bottom edge of the wall, then stick it to the board. Hold it there. Smooth any excess that has squished out at the bottom. The rest of the walls can go up smooth-side out. Now place one of the side walls up against the back and fix that to the board and the back wall using plenty of the icing as glue. When all of the main walls are standing, clean up any messy bits, then pipe a decorative but also structure-firming wiggly line (or rows of dots if you find that easier) over the wall joints and dry overnight. Meanwhile, fix the back, front and vertical panels of the dorma together and leave to dry.
Next day, fix the roof panels onto the house, right hand panel first, then the left. Once dry, attach the dorma window and then fix on its flat roof. Note that the back piece of the dorma will have to be rough-side outwards, or it won’t fix together. While these firm up, colour the coconut with a little green colouring and splash of water; mix well with your hands until evenly green. Knead together the red and yellow fondant icing to make orange, then roll into balls of different shapes and sizes. To shape into pumpkins, score lines down the outside of each ball with a cocktail stick, then squash the ball to make it pumpkin-shaped. Use the green fondant icing to make leaves and stalks. Roll out and cut windows from the black icing.
When the roof is stable, you can cover it in button ‘tiles’. Overlap the giant buttons, using a little blob of the purple icing on each one as glue. Cut to fit around any awkward bits, and attach a row of half-moon tiles around the front roofline.
Now you can fill any gaps in the roof with blobs of the purple icing, fix on the windows, the door, decorate their frames and fix on the Smartie decorations and door knob. Slice the Mars bar at an angle and affix the chimney. Loosen the leftover white icing with a few drops of water to make it pipe-able, then pipe on cobwebs (I used a size 2 nozzle, but you could snip off the end of the piping bag instead), then add the ghostly eyes at the windows. Loosen the white leftovers further, then spread over the board. Sprinkle with the coconut grass, then top with the pumpkins. For the finishing touch, add a dot of colour to the eyes, then leave to dry.