
Creating your wedding cake
By Jane Hornby
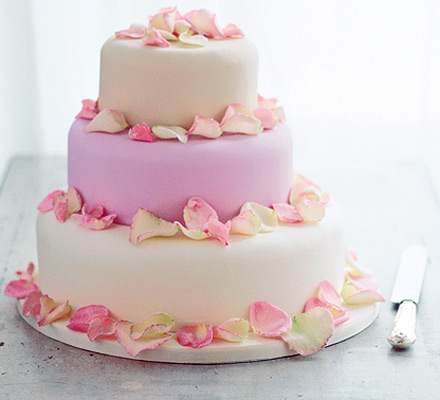
Jane Hornby’s wedding cake is our simplest ever. And each tier is flavoured differently, so there’s something for everyone…
- Several hours depending on ability
- Serves 104
- Easy
Nutrition per serving
-
kcal 0
-
fat 0g
-
saturates 0g
-
carbs 0g
-
sugars 0g
-
fibre 0g
-
protein 0g
-
salt 0g
Ingredients
- 1 x top tier, see 'Goes well with'
- 1 x middle tier, see 'Goes well with'
- 1 x bottom tier, see 'Goes well with'
- half a 454g jar apricot jam, you'll use the rest later
- 500g pack natural marzipan
- 500g unsalted butter, softened
- 1kg icing sugar, sifted
- jar good-quality lemon curd
- 142ml carton double cream
- 200g bar plain chocolate (70% cocoa), broken into pieces
- FRUIT CAKE - 500g/1lb2oz white ready-to-roll icing, cream food colouring paste
- LEMON CAKE - 1kg/2lb4oz white ready-to-roll icing, dusty pink food-colouring paste
- CHOCOLATE CAKE - 1.7kg/3lb 10oz white ready-to-roll icing, ivory food-colouring paste
- FOR THE BOARD - 800g/1lb12oz white ready-to-roll icing, ivory food-colouring paste
- 200g icing sugar
- 1 egg white
- dowelling rods
- 15cm, 23cm and 30cm deep-round cake tin
- plenty greaseproof paper
- thick 35cm diameter silver cake drum (base)
- thin 15cm, 23cm and 30cm diameter silver cake board
- long serrated knife
- palette knife
- cream, ivory and pink food colouring pastes
- long roll ing pin
- 6 standard plastic dowelling rods
- strong kitchen scissors
- 1m ivory ribbon, 15mm wide
- medium artist's paintbrush
- cooling rack
- string for measuring
- 20cm, 25cm, 33cm cake boxes with lids (if transporting the cake)
Method
COVER THE FRUIT CAKE WITH THE MARZIPAN: How to do it: Boil the apricot jam with 2 tbsp water and sieve into a bowl. Brush the 15cm cake board with a little of the apricot jam. Cut off the rounded top of the cake and turn upside-down onto the board. Measure across the top and sides of the cake with string, cut to length and set the string aside. Brush the cake all over with a thin layer of apricot jam.
Dust the work surface with icing sugar and roll the marzipan into a circle big enough to cover the cake top and sides, using the cut string as a guide. Lift over the cake and smooth with your hands. Trim the marzipan to the base of the cake (so you can’t see the board) and leave to dry for one day if time. If not, the cake can be iced straight away.
FILL & COVER THE CHOCOLATE & LEMON CAKES WITH BUTTERCREAM: Adding good-quality lemon curd or silky chocolate ganache transforms simplebuttercream into an indulgent filling.
How you do it: First make the buttercream. Beat the butter until creamy, then gradually beat in the sifted icing sugar. Weigh 600g/1lb 5oz of the mix and stir 5 tbsp of the lemon curd into it.
In a small pan, bring the cream just to the boil, then pour over the chocolate. Leave to stand for 2 mins, then stir until smooth. Once cool but still liquid, fold into the remaining basic buttercream.
Once each cake is completely cool, level off the top using a long serrated knife. Spread a little of the corresponding buttercream over the matching thin cake board. Turn cake upside down onto the board and brush all over with a thin layer of the sieved apricot jam – this helps to prevent stray crumbs getting into the buttercream.
Cut into three layers horizontally - don’t worry if you cut the layers unevenly as it won’t affect the finished cake. If it’s a hot day or warm in your kitchen, refrigerate the cakes for a while – it will firm them up and make cutting and lifting much easier. Lift off each layer as you cut it, and set it aside so that when you re-stack the layers they are in the right order.
If you’ve made the buttercream in advance and it has hardened slightly, warm in the microwave on Defrost for 10 secs and beat well. Using a palette knife, spread approx 1/4 of the buttercream over the first layer of the cake. For the lemon cake, swirl another tbsp or so of lemon curd over the icing. Stack the remaining layers this way, spreading all of the remaining icing over the top and sides of the cake, smoothing it down to meet the cardboard cake base. Smooth all over with your palette knife and set aside. The cakes are now ready for covering with ready-to-roll icing. Filled with buttercream and iced, the cakes will keep for up to 3 days.
COVER ALL THE CAKES WITH READY-TO-ROLL ICING: The next stage is to subtly colour the different tiers with the ivory, dusky pink and cream colouring pastes.
How to do it: For the marzipanned fruit cake only, first lightly brush with cooled, boiled water to help the icing stick. For all the cakes, dust the work surface with icing sugar and knead the icing until pliable. Add a few specks of the food colouring with a toothpick or the end of a skewer – be very sparing as a little goes a long way. Work the colour in until you have an evenly coloured, smooth paste. Add more and knead again if you want the colour to be more intense.
Lightly dust the work surface again and roll the icing into a circle large enough to cover the sides and top of the cake, with a little excess. Use string to measure as before. Lift the icing over the cake, using your rolling pin to help you.
Smooth the icing around the cake with your hands, then trim off the excess with a sharp knife. Leave overnight to dry. Once iced, keep for 3 days.
Once you’ve iced the cakes, cover the 35cm base. Lightly brush with cooled, boiled water and cover with ivory-coloured icing. Trim and leave overnight to dry.
STACK THE CAKES: Dowels give stability and strength to tiered cakes. By measuring and cutting the dowels to the same length, you’re providing an even platform for the next cake to sit on, even if your cake is a bit wonky. For this cake, the tiers are stacked like steps, just off centre.
How you do it: In a large bowl, gradually beat icing sugar into the egg white until thick and smooth. Cover with cling film until ready to use.
Starting with the chocolate cake, insert three dowelling rods in a triangle, slightly offset to one side and no wider than the base of the lemon cake that’s going to sit on top. With a permanent pen, lightly mark where the top of the icing comes to on the dowel.
Carefully pull out the dowels and line up on the work surface. Using a ruler, re-mark each rod to the highest point. Score the dowels with scissors around the new marks and snap the plastic cleanly.
Re-insert the rods in their original holes, rounded end down. Cut the thin ivory ribbon to fit around the thick base board, securing at the back with glue or double-sided tape. To stack the cakes, spoon a little royal icing over each of the dowel holes. Carefully lift the chocolate cake onto the covered board, then stack cakes on top of one another, positioning each cake and gently lowering one side of it onto the base or cake below. Slide your palette knife under it at this point and gently lower the cake down. Slide the knife out at the last minute. (If you’re moving the cake to the venue, put the cakes into their boxes and take the icing with you.)
THE TIME PLAN: UP TO A MONTH AHEAD: 1. Make the fruit cake and cover with marzipan. 2. Make the chocolate and lemon cakes if freezing – they will freeze for up to 1 month (although they are best made fresh if you can).
UP TO 4 DAYS AHEAD: 1. Make the chocolate and lemon cakes if making fresh – keep well rapped in baking parchment and cling film in a cool place. 2. Make the chocolate and lemon buttercream and keep in the fridge. 3. Make the chocolate and lemon cakes if making fresh – keep well wrapped in baking parchment and cling film in a cool place. 4. Make the chocolate and lemon buttercream and keep in the fridge.
UP TO 3 DAYS AHEAD: 1. Fill and cover the chocolate and lemon cakes with buttercream and cover all of the cakes and the board with icing. 2. Insert the dowelling rods.
UP TO 2 DAYS AHEAD: 1. Frost the rose petals.
ON THE DAY: 1. Stack the cakes and decorate with petals once the cakes are in place.