
White sourdough
Master the art of making sourdough bread with our step-by-step recipe. Learn how to create a starter, levain and the loaf itself with our expert tips.
-
Prep:1 hrs
Cook:40 mins
plus six days feeding the starter, chilling and cooling - A challenge
Nutrition per serving
-
kcal 171
-
fat 1g
-
saturates 0.1g
-
carbs 35g
-
sugars 0.2g
-
fibre 1g
-
protein 6g
-
salt 0.8g
Ingredients
- 250g strong white bread flour, preferably organic or stoneground
- 1 tbsp sourdough starter (see above)
- 100g strong white bread flour, preferably organic or stoneground
- levain (see above)
- 1kg strong white bread flour, preferably organic or stoneground, plus extra for dusting
- 20g fine sea salt
Method
Day 1, Monday: To begin your starter, mix 50g flour with 50g tepid water in a jar or, better still, a plastic container. Make sure all the flour is incorporated and leave, semi-uncovered, at room temperature for 24 hrs.
Day 2, Tuesday: Mix 50g flour with 50g tepid water and stir into yesterday’s mixture. Make sure all the flour is incorporated and leave, semi-uncovered, at room temperature for another 24 hrs.
Day 3, Wednesday: Mix 50g flour with 50g tepid water and stir into yesterday’s mixture. Make sure all the flour is incorporated and leave, semi-uncovered, at room temperature for another 24 hrs.
Day 4, Thursday: You should start to see some activity in the mixture now; there should be some bubbles forming and bubbling on top. Mix 50g flour with 50g tepid water and stir into yesterday’s mixture. Make sure all the flour is incorporated and leave, semi-uncovered, at room temperature for another 24 hrs.
Day 5, Friday:The mixture should be very active now and ready for making your levain. If it’s not bubbling, continue to feed it on a daily basis until it does. When it’s ready, it should smell like yogurt.
You now have a starter, which is the base to the bread. You’ll need to look after it, but naming is optional! Keep it in the fridge (it will stay dormant) and 24 hrs before you want to use it, pour half of it off and feed it with 100g flour and 100g water. Leave it at room temperature and it should become active again. The longer the starter has been dormant, the more times it will need to be refreshed – the process of pouring off half the starter and replacing it with new flour and water – to reactivate. If your starter is ready to use, a teaspoonful of the mixture should float in warm water.
For the levainMix 1 tbsp of the starter with 100g flour and 100g water (this is the same process as feeding the starter, but you should do this in a new, separate bowl, keeping the original starter as back-up, as this is the mixture you'll use to bake your bread). Leave the levain for 8 hrs at room temperature until it becomes active. When ready, a teaspoonful of the mixture should float in warm water.
For the breadPour 600g tepid water into the levain and stir with a rubber spatula to mix together – don’t worry if there are unmixed bits of levain. Tip in the flour and mix everything together with a rubber spatula to make a rough dough, ensuring all the flour is incorporated evenly and that there are no dry bits up the side of the bowl. Cover and leave somewhere warm for at least 30 mins, or up to 4 hrs.
Sprinkle over the salt and add 50g water to the dough. Pinch and scrunch the salt and water through the dough with your hands. If the dough goes stringy (like old chewing gum), just keep working it until it’s one smooth texture. Leave for another 15 mins.
Wet your hands, grab the dough from one side and stretch it over itself, then repeat with the other side. This stretching technique helps develop the gluten. Pick the dough up and curl it around onto itself, then cover and leave for another 20-30 mins. Repeat this process two more times (three in total), then leave the dough for another 2-3 hrs until it’s risen by about 30% and looks bubbly and soft.
Using a rubber spatula, scrape the dough out onto a lightly floured work surface and split in two. Fold each piece onto itself to create a ball, then leave uncovered for 30 mins. The dough balls will spread during this time.
Dust two bread-proving baskets generously with flour. Scrape one of the balls of dough off the work surface, then fold it onto itself to create a tight ball that’s trapped in all the air. Lift the ball into a basket, seam-side up, then transfer to the fridge to chill overnight, or for up to 18 hrs. Repeat with the other dough ball.
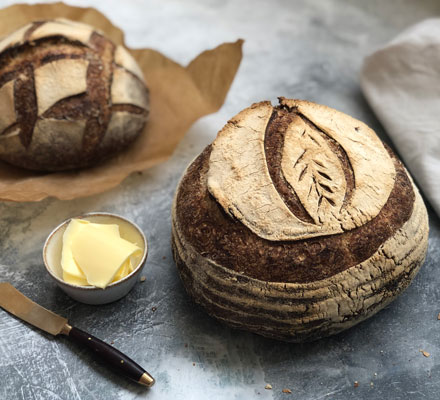
Heat the oven to 240C/220C fan/gas 9 and put a lidded casserole dish in the oven to heat. Cut a sheet of baking parchment into a square slightly larger than the base of one of the loaves. Carefully remove the hot casserole dish from the oven and remove the lid. Invert one loaf onto the baking parchment, then, working quickly, score the top at an angle. Use the corners of the parchment to lift the loaf into the casserole dish. Cover with the lid and bake for 30 mins, then carefully uncover and continue to bake for another 10 mins (or longer for a darker finish). Carefully lift the bread out of the dish using a spatula, transfer to a wire rack and leave to cool to room temperature before slicing. Repeat with the second loaf.